Showing posts with label Cupcakes. Show all posts

Sunday, July 31, 2011

Cupcakes Fit for Queen

So as it would seem...my mind works in a weird and wonderful way and from the moment I decided that this weekend's project would be a batch of delicious Black Bottomed Cupcakes, I've been humming along to Queen's "Fat Bottomed Girls." And as a friend so nicely pointed out, enough of the first, and you'll definitely get the second! Thankfully, I don't eat much of what I make...or else I may just have a British rock song in my honour. 

Black bottomed cupcakes are, essentially, chocolate cupcakes with a cheesecake centre. In other words: heaven. There are many, many variations of this recipe, some even start with a boxed mix. This recipe actually uses a very cool chocolate cake recipe with very few ingredients (as far as cake goes.) 

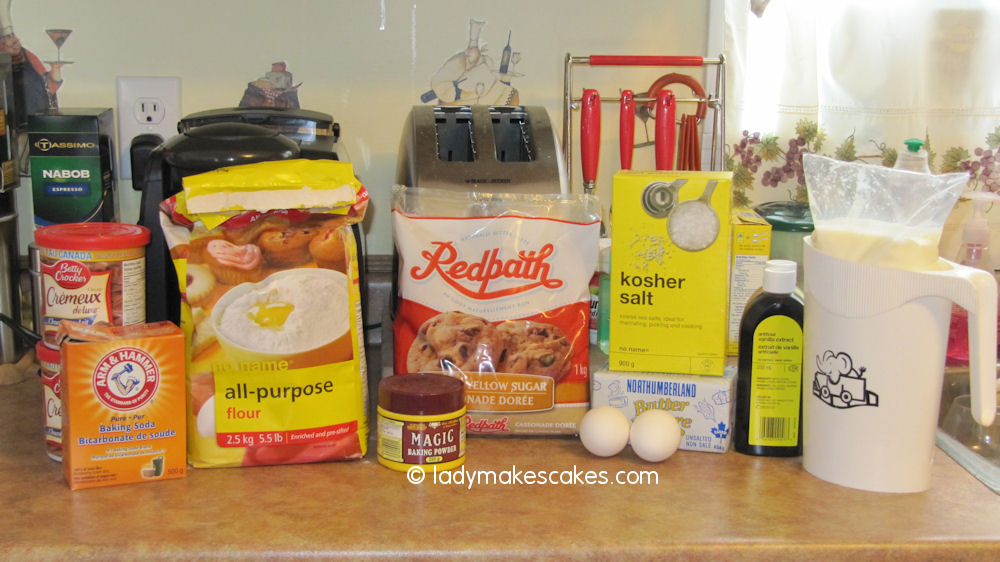
So we begin with the ingredients: 


In a mixer bowl, combine the filling ingredients: cream cheese, sugar, 1 egg and salt. 


Beat until everything is nice and fluffy, then stir in the chocolate chips. 


In a separate bowl (doesn't have to be a mixer bowl, this part can be done by hand) mix together: flour, sugar, cocoa, baking soda, and salt. 


Make a well in the middle and add the liquids: water, oil, vinegar and vanilla. Stir until well combined. 


Now, I know what you're thinking: a cake mix with no eggs?! It's true. I figured for all the richness of the filling, I'd use Crazy Cake for the base. There are many theories on Crazy Cake, but it seems to have originated during the Depression when kitchen staples like eggs and milk were hard to come by. I promise, even without eggs, this cake is awesome. 


Fill your muffin tins about 2/3 full. 


Then add a dollop of the cream cheese mixture to the top of each. (A cookie scoop works perfectly!) 


Bake them up at 350 for about 20 minutes (make sure you're using your toothpick tester in the outer edge of the cupcake, not the centre!) and enjoy the goodness!


In the first hour after the cupcakes cool, they're deliciously moist and gooey. Longer than that and they start to resemble a nicely set cheesecake in the middle. If you want a day old gooey cupcake, 10 seconds in the microwave will do the trick!


---------------------------------------------------


Black Bottomed Cupcakes

Filling:
1 package of cream cheese, softened
1 egg at room temperature
⅓ cup of white sugar
⅛ teaspoon of salt
1 cup of miniature chocolate chips

Cake:
1 ½ cups of all purpose flour
1 cup of white sugar
¼ cup of unsweetened cocoa
1 teaspoon of baking soda
½ teaspoon of salt
1 cup of water
⅓ cup of vegetable oil
1 tablespoon of vinegar
1 teaspoon of vanilla extract

Preheat the oven to 350F. Line your muffin tins with cupcake liners or spray with non-stick cooking spray.

In a mixer bowl, beat together the cream cheese, egg, ⅓ cup of sugar and ⅛ teaspoon of salt until light and fluffy. Stir in the chocolate chips and set the bowl aside.

In a separate bowl, mix together the flour, cup of sugar, cocoa, baking soda and salt. Make a well in the middle, then add the wet ingredients: water, oil, vinegar and vanilla extract. Stir together until well-blended.

Fill each of the muffin liners about ⅔ way full and top with a dollop of the cheesecake mixture.

Bake for 20 minutes or until a toothpick inserted into the cake part of your cupcake comes out clean.

Remove from pan after 5 minutes and cool completely on a rack. Enjoy!!


Monday, May 30, 2011

Summer Lovin'

First and foremost...I must extend my sincerest of apologies for the gap between posts. You know how they say "when it rains, it pours"? Well "they" are right!! I've been rather busy these past few weeks, work has picked up significantly and apparently owning a house requires one to actually to work on said house. Who knew?


Today's recipe comes as part of a request from a friend of mine. They're also a great little treat to remind us that summer is, indeed, coming! And what better way to celebrate the warm weather than a Banana Split -- in cupcake form, of course! These moist banana cupcakes are infused with caramel, have bits of cherries and chocolate chips, and are topped with a marshmallow fluff icing and choclate sauce. Peanuts, as always, are optional :)


And so, at long last, I present to you:

Banana Split Cupcakes

As always, we begin with our ingredients. To make this recipe easy and user friendly, I skipped the complications of making a basic cupcakes recipe from scratch and opted for a yellow cake mix as the base. 


First, put your cake mix in the mixer bowl. Reserve two tablespoons of mix in a separate bowl (we'll get to that later) 


Combine the cake mix, eggs, water and banana on low for 30 seconds, then on medium-high for 2 minutes. 


While all that is going on, combine your chopped cherries with the reserved cake mix. This will keep them from sinking to the bottom of the cupcakes. Add the cherry mix and chocolate chips to the batter and stir until well combined. 


Divide into 24 lined cups (I actually ended up with 28) and bake for 15 - 20 minutes. 


Just on their own, the color is really nice on these. And they smell AMAZING!


Once they're done, let them cool completely on a rack. 


[time lapse]


You can omit this step if you'd like:


Once the cupcakes are cooled, take a wooden skewer (or the back of a wooden spoon if you prefer) and poke a few holes in the top of each cupcake. 


Drizzle with caramel topping and let it soak into the cake. 


Combine the marshmallow fluff and frosting until well blended. 


Frost the cupcakes and drizzle with chocolate sauce. 


And, of course, don't forget the cherry on top! You can add whatever toppings you like. I personally like peanuts and sprinkles :) 


Happy Baking!!

Crystal 

-----------------------------------------------

Banana Split Cupcakes

1 box of yellow cake mix
1 cup of water
3 large eggs
1 cup of ripe, mashed banana
1 cup of chopped maraschino cherries, well drained
1 cup of miniature chocolate chips
Caramel Topping (optional)

For the frosting: 
1 1/2 cup of prepared vanilla frosting (homemade or canned)
1/2 cup of marshmallow fluff


Preheat the oven to 350 F


Reserve two tablespoons of cake mix in a small bowl. In your mixer bowl, combine the rest of the cake mix, water, eggs and mashed banana until well combined (30 seconds on low + 2 minutes on medium-high.) 


Meanwhile, mix the chopped cherries and miniature chocolate chips with the reserved cake mix. Once the batter is done mixing, combine the cherry & chip mixture with the batter until everything is well combined. 


Divide among 24 lined pans and bake for approximately 15-20 minutes, or until a toothpick comes out clean. Allow to cool completely on a wire rack. 


[Optional]


With the end of a wooden spoon or skewer, poke a few holes in the top of each cool cupcake and spoon in caramel ice cream topping. Let it soak into the cake while you prepare the frosting. 


For the frosting, combine the marshmallow fluff and icing until well combined. There will be enough to generously ice each of the cupcakes. 


Drizzle with chocolate, add your favourite toppings and enjoy! 


Sunday, April 17, 2011

Impatience...

One of my favourite things...to do in the summer is to take a drive with my husband after dinner and go get an ice cream cone at one of the many shops that pop up with the warmer weather. As with much of my life, I tend to lean towards simplicity and often opt for chocolate or vanilla and it's always perfection.

Well, in LMC land there is still a significant amount of snow on the ground and this does not generally bode well for the opening of the ice cream shops. Finding myself somewhat impatient with the fact that summer is nowhere near, this week, I decided to take matters into my own hands. The result? These super cute ice cream cone cupcakes that will make anyone wish for the days to come!


What I like the most about these is the fact that they can be made in any flavours you wish. I chose chocolate cake with a vanilla buttercream icing. 


Easily enough, the first step is to just make your cake mix according to the instructions on the box. 


Once that's all done, line your muffin pans, not with baking cups, but with ice cream cones! Fill each one with about a third of the way. You'll likely get much more than 2 dozen out of this technique. I tried to get an even 24 and, well, you'll see why that didn't work out so well!


Bake according to the instructions on your cake box. 


Meanwhile, prepare your frosting. Like I said, you can use any kind of frosting you want, but I opted for a vanilla buttercream. I like white icing when using sprinkles because they pop better on the lighter surface. 


Buttercream Icing
 (I doubled the recipe for my cupcakes)

1/2 cups of unsalted butter, softened
4 cups of powdered sugar
1/2 teaspoon of salt
1/3 cup of milk
1 teaspoon of vanilla extract 


Cream the butter, then add the powdered sugar and milk. If the mixture is too thick, add a little more milk, if too thin add a little extra sugar. Mix in the salt and vanilla and blend until smooth. 


Once your cupcakes are done (toothpick!) take them out and let them cool. 


Now, this is where I pass along some hands-on baking experience and remind you that you really can't put a lot of batter in these things. While the front one looks great, you'll see in the background that they didn't all look as spectacular. Thankfully, the frosting will hide much of the flaws! 


 Using a 1M tip, pipe a cute little swirl on the top of each cupcake. Or, you can simply frost them with a regular knife. Or make flowers. Let your imagination take over!! 


But don't forget the sprinkles!!


 Take a big bite, sit back and wait (impatiently or otherwise) for summer to come along!


Happy Baking!! xox

Crystal 


Vanilla Buttercream Icing Recipe:


Thursday, April 7, 2011

The Bathurst/Gloucester SPCA

Quincy and I met by chance, one afternoon 5 years ago while visiting the Bathurst/Gloucester SPCA. My mom and I were in the area and she wanted to go look at the kittens (I suppose my love of animals is somewhat hereditary.) While mom ooh and awwed over the adorable little balls of fluff, I decided that I would wander out back to see the dogs. I  already had three cats and was in no mood to add to that total!! I figured looking at the dogs would be safe since I'd never had the intention to get a dog of my own.

The dogs were outside and, of course, barked like crazies when I walked out towards them. There was one in particular, a Jack Russel, who was eager to show off that he could jump to my eye level with, what seemed like, very little effort. Everywhere, paws clamored against the kennel doors, with rattling and barking at an almost overwhelming decible. The volounteer and I shared a quick comment about how loud it was as I walked along the cages and said hi to each of the dogs, all happy for attention. My eyes met the bouncy Jack Russel's, but something behind him caught my eye more than this little dogs boundiful feats.

Between his kennel and that of a large husky, I first saw Quincy.

Unlike the other dogs, this shaggy, brown and black mutt wasn't barking or trying to get my attention. He wasn't even too interested when I knelt down in front of him and said hello. Instead, he stuck his shiney black nose out between the chain links, licked my outstretched hand once, then turned and went to sit at the back of his cage. No barking, no outward display of excitement.

I asked the SPCA volounteer about the sad dog and she went to get his information for me. She told me he'd been adopted but was recently returned. Already a fragile little soul, Quincy had decided it was best not to get his hopes up when someone came by to see him. As we both stood looking at him, the volounteer said 5 words I'll never forget: "I think he gave up."

For the next 24 hours, I was unable to get that scruffy, 30 pounds of dog out of my mind. I didn't want a dog! I had a roommate who already had a dog, and I had three cats of my own. But now, somehow, I had only one goal in mind: getting Quincy home. Several phonecalls, one heart-felt plea to my roommate and a few pages of paperwork later, I found myself sitting in the front office at the SPCA once more, nervously trying to read the faces of the ladies looking over my application. Then they turned to me and asked "So, when do you want to come pick up your dog?"

My dog.

This sweet, loveable mutt who was "too much work" for his past people and had been bounced between home and shelter was welcomed into his forever home on that afternoon in June of 2006. And that sad little dog who looked out at me with big brown eyes is now a happy, funny and loving creature who both my husband and I adore. His world is now a balance between playing fetch with his tennis ball, his stuffed toy bunny and cuddling with his "Mama" and "Daddy." I cannot say enough about the Bathurst SPCA and will forever be thankful to them for being there for Quincy when he needed someone to love him.

On April 30th, 2011, Lady Makes Cakes will be donating cupcakes and cake pops to the Greater Bathurst Business & Professional Women's Network to help in their efforts to raise much needed funds to help our friends at the shelter continue to do the work that they do. A table will be set up at the Bathurst Farmer's Market, so if you're in the area that weekend, be sure to stop by, pick up a yummy treat and contribute generously to this great cause!


Love you Booboo!!


Sunday, March 6, 2011

Doughn't You Want Some?

After many, many kind words about the Daisy & Bee Cupcakes last weekend, I decided to let my friends decide which recipe I'd tackle next. Given the choice of truffles or cookie dough cupcakes, the overwhelming response came in: Cookie Dough Cupcakes. 

And really? I can't blame you! Because what better way to combine the kitchens two most popular products, the fluffy cupcake and the modest chocolate chip cookie, than to put them together into a sweet treat that's sure to become a new favourite! 

First of all, we'll need some ingredients: 


At this point, you have two choices where the cookie dough is concerned. Option one is to make your own batch of chocolate chip cookie dough (see recipe here:) Once the dough is made, use a melon scoop to make small, rounded balls of cookie dough. Then, freeze them until they are solid. Keep them in the freezer until you are ready to use them, or else the dough will cook too much and dry out the inside of your pretty cupcakes!! Option number two (and the popular choice in the Lady Makes Cakes kitchen) is to buy a package of this: 


and freeze it. Much easier, and this way you're sure the portions are just right! But whichever way you choose to go about adding cookie dough to your project will work :) 

The basic cupcake is exactly that: a basic, yellow cupcake which has been altered only a little to give it a nod towards the cookie dough. Instead of using the usual white sugar, we will be substituting a light brown sugar, one of the ingredients that give chocolate chip cookies their great taste!

First, we'll get the butter and sugar beaten together until they start to look fluffy:


Then, beat in the eggs one by one until it's all well-blended. 


Meanwhile, in bowl, sift together the flour, baking soda, baking powder and salt.


 In a measuring cup, measure out the milk and vanilla together. 


Starting and ending with the flour mixture, alternate flour and milk mixture until everything is blended together. 


Take the previously prepared, frozen cookie dough and place one ball in each of 12 cupcake liners.


 Fill the cups with batter and put them to bake for about 20 minutes. 


(n.b. Using the old "toothpick" method on these guys won't work since you'll be sticking the toothpick into the cookie dough. To tell when your cupcakes are done, lightly pretty the tops. If they bounce back, they're good to go! :) 

How good do these look?!


For the icing, I just used a can of milk chocolate frosting. If you have a favourite flavour, I invite you to experiment with flavors and textures. I chose to melt my frosting in the microwave for a few seconds in the microwave and dip the cupcakes, giving them a nice, ganache style finish! 


The ultimate indulgence: Cookie Dough encased in a Cupcake. Yum!!


And as a bonus to this weeks tribute to the chocolate chip cookie, I've added a little recipe at the bottom. Be sure to check it out!

Happy Baking!! 

Crystal


---------------------------

 
Chocolate Chip Cookie Dough Cupcakes

Ingredients

3/4 cup of unsalted butter, softened to room temperature
3/4 cup of brown sugar (I prefer the light, but it depends of how much taste you want)
2 eggs at room temperature
1 1/3 cup of flour
1/2 teaspoon each of baking powder and baking soda
A pinch of salt
1/2 cup of milk (whole milk works best, I used 1%)
A teaspoon of vanilla
12 balls of prepared chocolate chip cookie dough, frozen 

Directions


1. Cream the butter in a mixer fit with a paddle (about 30 seconds)

2. Add the sugar and blend until everything is light and fluffy (about 2 1/2 minutes)

3. Add the eggs, one at a time, mixing each one until it's well-blended

4. In a bowl, sift the flour, baking soda, baking sugar and salt

5. In a measuring cup, measure the milk and vanilla together

6. Alternating -- beginning and ending with the flour mixture -- add a fourth of the flour mixture, then a third of the liquid, mixing in between until everything is well-blended. 

7. Place one piece of cookie dough in each of 12 cupcake liners

8. Fill each liner with batter and bake for 20 minutes, or until the tops of the cupcakes spring back when touched. 

Cool completely on a rack, then ice with your favourite topping!

--------------

Bonus Recipe!!

Eggless Cookie Dough

(yep, you heard right. Cookie dough that can be eaten with no worries about eating raw eggs!) 

Ingredients

1/2 cup all-purpose flour
2 1/2 tablespoons brown sugar
3 tablespoons white sugar
2 tablespoons butter, softened
1/8 teaspoon vanilla extract
2 tablespoons water

Directions

  1. In a medium bowl, mix together the brown sugar, white sugar, and butter until smooth. Stir in vanilla and water. Mix in the flour until well blended. Refrigerate for 1-2 hours, then enjoy!! :)