Sunday, March 27, 2011

Can A Cake Pop?

No, but a tin can! 

Nothing?

Nobody? Wow, tough crowd!...

Inspired by my recent purchases whilst on vacation, I decided to try my hand at cake pops this weekend. These simple little treats make a big impact, whether you're making simple, truffle-style ones for a bake sale or beautiful bride & groom pops for a wedding shower.

One thing I love about cake pops is how easy they are to begin making. There's no fancy recipes, tricks or skills needed as the entire thing begins with two items you likely already have in your cupboard: a cake mix and a can of frosting. For the purpose of these instructions (and because I've no use for 48 cake pops today) I'll be using 1/4th of the ingredients. Should you want to make 48 cake pops, it'll take the entire cake mix and the whole can of frosting. I'm using a fourth of a cake and therefore, a fourth of my can of frosting.

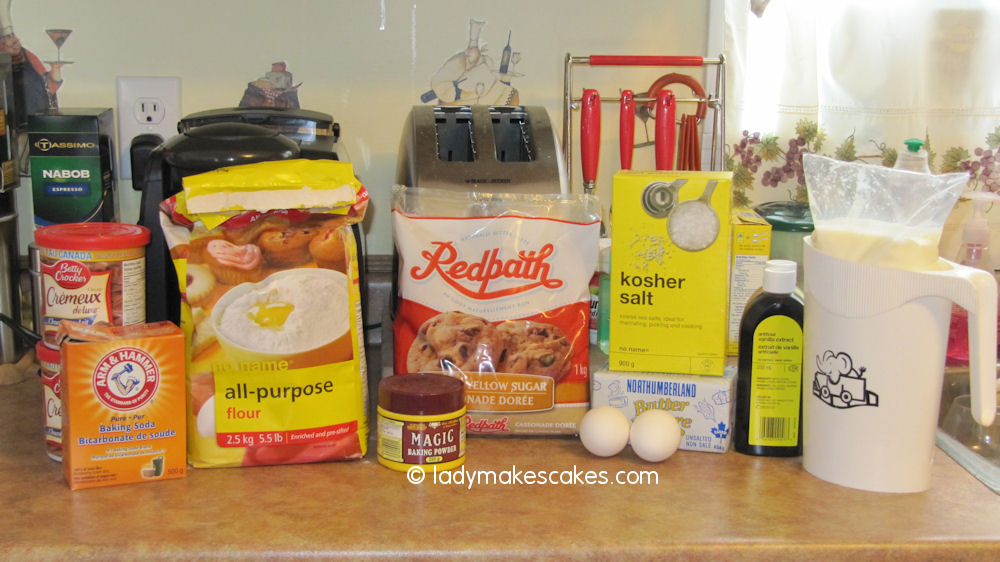
So, the first thing is to get some ingredients together:


In this case, you'll also need a few items to help with the assembly of your cake pops. First, you'll need some lollipop sticks (or "sucker sticks" if you're my friend Steve :P), a large block of Styrofoam and a plastic bottle (if you're planning on drizzling decorations on the finished pops.) If you want to simply make cake truffles, you can omit the sticks.

So, easily enough, the first step is to make your cake:


and put it in the oven to bake.


Once the cake is all cooled and you're able to handle it, quarter it (see above note) and crumble it into a large bowl.


Spoon in some frosting and mix until you get something that looks a little bit like cake play dough.


With the aid of a cookie scoop (or just a regular spoon if you don't have a cookie scoop) divide the dough evenly into balls and place them on a non-stick cookie sheet line with parchment paper or wax paper or an awesome Silpat baking mat! :)


Next, take a handful or two of chocolate chips and melt them in a small bowl in the microwave. These are just for "glue" so you don't have to worry about what kind of chocolate chips you use. Whatever you've got on hand.


Take the ends of your lollipop sticks and dip the ends in the melted chocolate, then into the balls of cake, no more than halfway. This will help the stick stay in the cake, since the mixture is pretty soft.


(if you're keeping head count, yes, there's only 11. I dropped one...oops!)

Put the whole pan into the freezer for about 2 hours so everything gets nice and firm! Mine will be in for more than 2 hours because it's just about dinner time at the LMC kitchen. Cst. LMC is on night shifts, so he'll be awake soon -- and HUNGRY!

[3 1/2 hours later...]

Now that the cake pops have had lots of time to freeze, it's time to dip them!

Melt your chocolate or candy melts in the microwave or over a double boiler. If you're using candy melts, be sure not to over heat them or to allow any moisture to get in the mix, otherwise you'll lose your consistency and the dip will be unusable.

I have a technique I like to use and it generally makes dipping easier. I melt my chocolate in a large mug. That way, I have the depth to dip in and the ceramic keeps the chocolate softer longer :)


One by one, dip the cake pops into the melted chocolate and give them a little spin so the excess drips off. Because the cake is pretty cold, the chocolate will harden pretty quickly.


You can use whatever you want to keep the pops upright...I use a Styrofoam block, but a thick cardboard box with holes pre-punched in it works well too :) Or, if you don't mind flat bottoms, you can just turn them back upside down on the cookie sheet! :)


I tend to double dip if I have enough stuff and especially if I am using a light colored chocolate over a dark colored cake! I do all the dipping, let them harden, then dip again. But that's entirely up to you. And, if you're going to use sprinkles, make sure to do it right after you dip, because otherwise, they may not stick.

I chose (you guessed it) more chocolate!


The decorating possibilities with cake pops are endless and I encourage you to be as creative as possible when trying these. Have fun and enjoy the yummy outcome!


Happy Dipping (and baking!!)

Crystal

Saturday, March 26, 2011

Sugar and Cinnamon Spice

Last weekend while sitting at Cinnabon...I discovered that Mr. LMC really, really likes cinnamon rolls. I think I may have already knew this, but I definitely made a mental note to find an easy cinnamon roll recipe so I could make some homemade soon.

Soon came today!

This is actually my grandmother's recipe and while I thought it wasn't going to turn out, the final results were great! Plus, I now have proof that I can make something other than cake and cupcakes!! :)


Cinnamon Rolls


As always, we begin with our ingredients:


First, mix together the flour, sugar, baking powder and salt in a large bowl.


Cut in the margarine (if you have a pastry cutter, all the better. I use two knives.)


Break an egg into a measuring cup, then add milk to bring the total contents up to 3/4 of a cup. (There is an egg in there, I promise!)


Add the milk and egg to the dry mixture and mix well.


Now, Memère's recipe says that you can knead this into a "soft" dough. However, the dough was super soft and sticky...


I ended up measuring out a little less than a 1/4 cup of flour and used it on my hands and in the bowl to get the  dough to a workable stage. After a little kneading and giving it a pep talk, the dough ended up like this:


Next step is to roll the dough out on a floured surface. The goal shape is a large rectangle. Mine was more of a flattened circle/square. Once your dough is all rolled out, spread margarine over the surface, then sprinkle with the brown sugar and cinnamon.


Roll the dough on the LONG end (left to right in the above picture) and slice about 10-12 pieces. Put them on a cookie sheet lined with parchment paper, or, in my case, line with my awesome new Silpat­® baking mat. 


Bake for 12-15 minutes at 350. Once they're cooled, ice them with your favourite icing, drizzle with caramel topping or just leave them plain. Any way, they're delicious!!


Happy Baking!! 

Crystal xox


Cinnamon Rolls


2 cups of flour
1/3 cups of white sugar
4 tsp baking powder
1 tsp salt
5 tbsp margarine
1 egg
Milk *see recipe for qty

Filling

2 tsp margarine
1/2 cup brown sugar
2 tsp cinnamon

Preheat the oven to 350.

In a bowl, mix together the first four ingredients. Cut in 5 teaspoons of margarine. In a measuring cup, add one egg then fill the cup with milk up to 3/4 of a cup*. Mix all, then knead to a soft dough.

Roll the dough into a rectangle shape on a floured board or baking surface. Spread with margarine, brown sugar and cinnamon. Roll on the long side and cut into pieces (between 10-12).

Place on a lined cookie sheet and bake for 12-15 minutes.

Enjoy!!


Monday, March 21, 2011

A Weekend Cake-ation

So as it turns out...I couldn't even take a whole weekend off without involving cake and cupcakes :) In three days, I made a pretty good haul, coming home with 4 new sets fondant cutters, some adorable cupcake boxes, a few new icing tips and, best of all, a new book!!

The book comes from a fellow blogger and baker (far more talented than myself.) I'd been to Bakerella.com before and was very excited to hear that she'd published a book dedicated to adorable cake pops. I've tried these before, but in all honesty, they looked like little blobs of chocolate on a stick rather than the cute little creations Bakerella seemed to create.

I highly recommend this book and it's many wonderful tips and tricks. I'm very much looking forward to trying out cupcake pops in the near future!!

You can find the book on Amazon here: Cake Pops

How cute are they?!

Tonight I'm making a cake for my grandmother's 70th birthday, and I've yet to decide on a theme. It's going to be a cookies and cream cake, that much I've decided. I suppose some time between now and 5 p.m. I'll decide what I'm going to do with it. I'll be sure to document the progress of the decorations and update soon!

Happy Baking!

Crystal

Wednesday, March 16, 2011

Vacation and Birthday Cake

Along with my wishes...to everyone for a safe and happy St. Patrick's Day I just wanted to let you all know that there won't be a full-on project this weekend, as I'm taking a much-needed long weekend to spend with my wonderful husband. Nothing special, just three whole days of nothingness!! Our lives don't always allow for this kind of time, so I'm very much looking forward to it :)

However, my grandmother's birthday is coming up next week and (of course) I'll be making her a cake! I'll be using a technique that's out of the norm for me (i.e. not fondant) and so I'll be sure to document the process and hopefully teach those of you interested a few simple decorating techniques. 


Until then, may your lives be full of happiness and may you always have time to stop for a cupcake. 


Happy Baking!


Crystal

Sunday, March 13, 2011

When Irish Eyes are Smilin'

Ah St. Patrick's Day...the one day out of the year when those with no more than a smidgen of Irish heritage ("My 17th cousin twice removed is Irish!") can go out and celebrate with a pint of green beer and nobody asks questions. Mostly because everyone's drunk. 

In honour of my more than 1/17th Irish heritage, this week I decided to whip up some Irish Car Bomb Cupcakes. If you've ever heard of an Irish Car Bomb or, more bravely, tried one, you know these drinks can pack a punch! Take half a pint of Guinness then, in a shot glass, mix an ounce of Bailey's Irish Cream and an ounce of Irish Whiskey. Hold the shot glass above the pint, drop it in and chug the whole thing. That's how to party, St. Patty's style!!

These cupcakes combine a moist chocolate cupcake with hints of Guinness and a sweet Bailey's Irish (Butter)cream. The result? Well, give them a try and see! :) 


Irish Car Bomb Cupcakes


First we need some ingredients:


The Guinness and butter go into a saucepan:


While all that is coming to a simmer, in a large bowl, sift the sugar, flour, salt and baking soda. 


Once the butter and Guinness mixture has come to a simmer, add the cocoa powder and whisk until it becomes a smooth, chocolatey mixture.

Put it aside to cool.

Meanwhile, in your mixer bowl, mix together your sour cream and eggs (which really doesn't sound like an appealing combination now that I'm typing it out...I promise, it'll be good!)


Once that's mixed, add the previously prepared chocolate mixture and mix everything together.


Now, I promise that I didn't get into the Guinness or the Baileys, but I forgot to take a picture while adding the flour mixture. But, the next step is to slowly incorporate the flour mixture into the Guinness mixture and stir until everything is smooth.

I did, however, remember to take the pictures of the batter in the pretty, pretty cupcake liners!! :) I managed to fill all 24 for once. This recipe make a lot of batter!


Exactly 17 minutes in the oven at 350F (ovens vary, yada yada) and the smell in my kitchen was so good!! Despite the fact that the batter reeked of Guinness (and I HATE the smell of beer) the final product turned out spectacularly!!

The frosting is a simple buttercream, but instead of using cream, I substituted 4 tablespoons (maybe a little more :) of Bailey's Irish Cream. It was SUPER thick, but I think my butter wasn't quite at a cooperative room temperature. It got way easier to work with afterwards!!


A little piping and the result was an adorable cupcake fit for a Saint! :)

Sláinte! 

Happy Baking!!

Crystal 


-----------------------------------------------------------------------


Irish Car Bomb Cupcakes


1 cup of Guinness
1 cup of unsalted butter (cut into 1 inch pieces)
3/4 cups unsweetened, Dutch-process cocoa powder
2 cups of all purpose flour
2 cups of sugar
1 1/2 teaspoons of baking soda
3/4 teaspoon of salt (a few pinches)
2 large eggs at room temperature
2/3 cup sour cream 


Preheat to 350F, line 2 cupcake pans with liners


In a large bowl sift together the flour, sugar, baking soda and salt. 


In a small sauce pan over medium heat, bring the Guinness and butter to a simmer. Whisk in the cocoa powder until everything is smooth. Put it aside to cool slightly while you do the next step. 


In a mixer bowl, mix together the sour cream and two eggs until they're well combined. 


Add the chocolate/Guinness mixture (be careful as it'll still be pretty warm) and mix on medium until it's all mixed well. 


Add the flour mixture and mix just long enough to combined. Give it a few good stirs with a rubber spatula to make sure everything is even. 


Fill the cupcake liners (I use a 2.5 oz ice cream scoop and one scoop per cup worked out perfectly) and bake for 17ish minutes (see above yada about oven times) When the toothpick is clean, the cupcakes are ready! Cool on a rack to room temperature. 


Bailey's Irish (Butter)cream


1/2 cup of unsalted butter at room temperature
3 to 4 cups of icing sugar
4 tablespoons of Bailey's Irish Cream


In a mixer bowl, beat the butter until it's light and fluffy. Slowly add the icing sugar and mix until it's thick and well combined (I used about 3 1/2 cups). Slowly drizzle in the Bailey's until everything is smooth. It'll smell awesome!!


BONUS: Whiskey Filling!


If you read the introduction, you'll notice I said that an authentic Irish Car Bomb is a mix of Guinness, Bailey's and Irish Whiskey. For the sake of being able to bring some of these to work with me on Monday, I omitted the whiskey part. But if you're brave and want to go for the authentic Irish goodness, here is a recipe for the filling. To fill the cupcakes, you can simply cut a small cone out of the middle of each unfrosted cupcake and use a piping bag or sandwich bag with a snipped corner to fill them. Then frost as usual over top! :) 


8 ounces of bittersweet chocolate (chopped)
2/3 cup of heavy cream
2 tablespoons of room temperature, unsalted butter
1 to 2 tablespoons of Irish whiskey


Put the chocolate in a heatproof bowl. Heat the cream until is begins to simmer then pour it over top of the chocolate. Let it sit for a few moments, then whisk until it's smooth. Add the butter and whiskey and stir until smooth. 


(You can always omit the whiskey if you want the chocolate center without the extra punch!)


Tuesday, March 8, 2011

The Pursuit of Perfection


While fine-tuning a recipe for St. Patrick's Day (which may include some Bailey's Irish Cream!) I got to thinking of all the possibilities and all the flavours that can come together in a simple cupcake. Between the cake, the filling and the icing, there are thousands of options out there, waiting to be discovered.

So the question I have for you is this:

If you could walk into a cupcake shop and order the perfect cupcake, what kind would you ask for? What kind of cake, what kind of frosting? Would it have sprinkles? Fillings? Coconut? 

Let your imagination go wild and post your answers below!! I'll pick my favourite and put together a recipe and tutorial in a future entry :) Who knows, maybe you'll even end up as a regular on my menu!

Happy Baking!

Crystal

Sunday, March 6, 2011

Doughn't You Want Some?

After many, many kind words about the Daisy & Bee Cupcakes last weekend, I decided to let my friends decide which recipe I'd tackle next. Given the choice of truffles or cookie dough cupcakes, the overwhelming response came in: Cookie Dough Cupcakes. 

And really? I can't blame you! Because what better way to combine the kitchens two most popular products, the fluffy cupcake and the modest chocolate chip cookie, than to put them together into a sweet treat that's sure to become a new favourite! 

First of all, we'll need some ingredients: 


At this point, you have two choices where the cookie dough is concerned. Option one is to make your own batch of chocolate chip cookie dough (see recipe here:) Once the dough is made, use a melon scoop to make small, rounded balls of cookie dough. Then, freeze them until they are solid. Keep them in the freezer until you are ready to use them, or else the dough will cook too much and dry out the inside of your pretty cupcakes!! Option number two (and the popular choice in the Lady Makes Cakes kitchen) is to buy a package of this: 


and freeze it. Much easier, and this way you're sure the portions are just right! But whichever way you choose to go about adding cookie dough to your project will work :) 

The basic cupcake is exactly that: a basic, yellow cupcake which has been altered only a little to give it a nod towards the cookie dough. Instead of using the usual white sugar, we will be substituting a light brown sugar, one of the ingredients that give chocolate chip cookies their great taste!

First, we'll get the butter and sugar beaten together until they start to look fluffy:


Then, beat in the eggs one by one until it's all well-blended. 


Meanwhile, in bowl, sift together the flour, baking soda, baking powder and salt.


 In a measuring cup, measure out the milk and vanilla together. 


Starting and ending with the flour mixture, alternate flour and milk mixture until everything is blended together. 


Take the previously prepared, frozen cookie dough and place one ball in each of 12 cupcake liners.


 Fill the cups with batter and put them to bake for about 20 minutes. 


(n.b. Using the old "toothpick" method on these guys won't work since you'll be sticking the toothpick into the cookie dough. To tell when your cupcakes are done, lightly pretty the tops. If they bounce back, they're good to go! :) 

How good do these look?!


For the icing, I just used a can of milk chocolate frosting. If you have a favourite flavour, I invite you to experiment with flavors and textures. I chose to melt my frosting in the microwave for a few seconds in the microwave and dip the cupcakes, giving them a nice, ganache style finish! 


The ultimate indulgence: Cookie Dough encased in a Cupcake. Yum!!


And as a bonus to this weeks tribute to the chocolate chip cookie, I've added a little recipe at the bottom. Be sure to check it out!

Happy Baking!! 

Crystal


---------------------------

 
Chocolate Chip Cookie Dough Cupcakes

Ingredients

3/4 cup of unsalted butter, softened to room temperature
3/4 cup of brown sugar (I prefer the light, but it depends of how much taste you want)
2 eggs at room temperature
1 1/3 cup of flour
1/2 teaspoon each of baking powder and baking soda
A pinch of salt
1/2 cup of milk (whole milk works best, I used 1%)
A teaspoon of vanilla
12 balls of prepared chocolate chip cookie dough, frozen 

Directions


1. Cream the butter in a mixer fit with a paddle (about 30 seconds)

2. Add the sugar and blend until everything is light and fluffy (about 2 1/2 minutes)

3. Add the eggs, one at a time, mixing each one until it's well-blended

4. In a bowl, sift the flour, baking soda, baking sugar and salt

5. In a measuring cup, measure the milk and vanilla together

6. Alternating -- beginning and ending with the flour mixture -- add a fourth of the flour mixture, then a third of the liquid, mixing in between until everything is well-blended. 

7. Place one piece of cookie dough in each of 12 cupcake liners

8. Fill each liner with batter and bake for 20 minutes, or until the tops of the cupcakes spring back when touched. 

Cool completely on a rack, then ice with your favourite topping!

--------------

Bonus Recipe!!

Eggless Cookie Dough

(yep, you heard right. Cookie dough that can be eaten with no worries about eating raw eggs!) 

Ingredients

1/2 cup all-purpose flour
2 1/2 tablespoons brown sugar
3 tablespoons white sugar
2 tablespoons butter, softened
1/8 teaspoon vanilla extract
2 tablespoons water

Directions

  1. In a medium bowl, mix together the brown sugar, white sugar, and butter until smooth. Stir in vanilla and water. Mix in the flour until well blended. Refrigerate for 1-2 hours, then enjoy!! :)